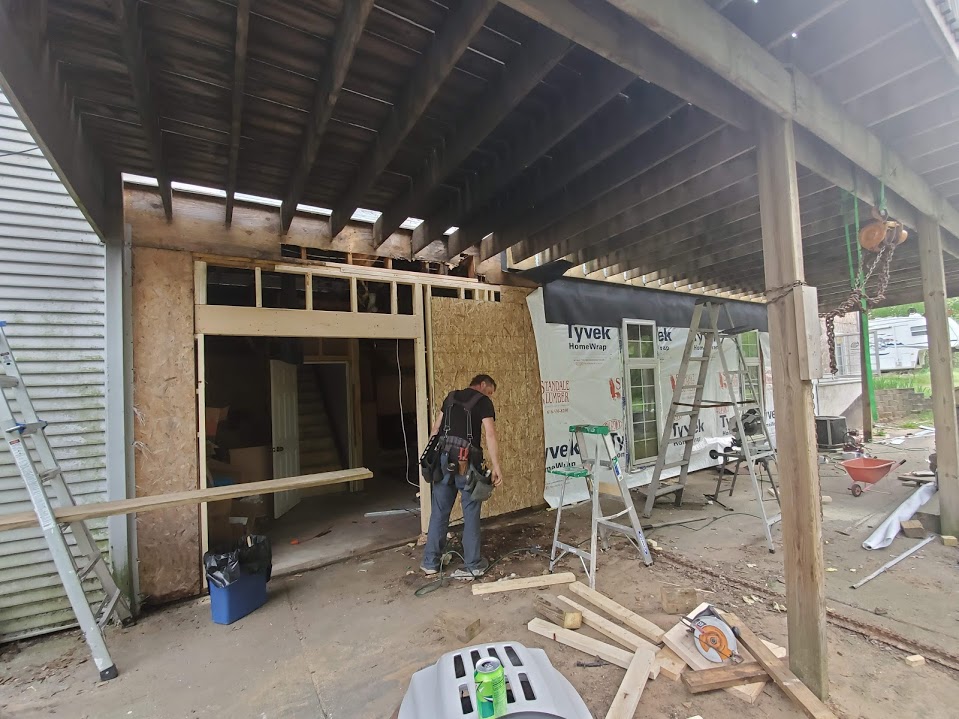
When we bought our house, the sheister (is that even spelled right) we bought it from did a bunch of lying and deceiving. We got a decent deal on it but we would have paid even less had we known about some of the issues that he'd intentionally hidden. I mentioned the leaking skylights in a prior post. The other major issue was the rotting basement wall because of a poorly built deck. This summer we (meaning Mark did the work and I cleaned the mess up) tackled that project. He removed all of the siding from under the deck, removed support posts that were there in lieu of the ledger board that should have been there, and removed all of the rotten wall. He then had to cut the deck joists to allow room for the new ledger board, install the new ledger, rebuild the wall, replace the busted slider, reside the wall, secure the deck. While he was at it, we moved around the door and a window in the basement to be more functional in light of the new interior stairwell. We also moved the pellet stove to better heat the space.


Installing the new ledger board and tearing out the rotted wall, beams, and studs. We sat with a hole in our wall for over a week. I was not a big fan but fortunately the weather was cooperative.


Putting in the new header for the new french door. The previous slider was an 8' wide standard slider. To replace it, it would have been several thousand dollars so we started considering our options. I love french doors and yet we needed to be able to take very wide things in and out of the basement so we opted for this door. French but both doors open to allow us full use of the opening for those very wide things. Win.
Ledger board is up, tyvek is on, door is set, window is re-placed, clean up is midway done. You wouldn't believe how big of a mess my husband can make!! lol.
Our realtor and his wife are friends of ours. Just after we moved in, they gave us a dining room set. They later gave us their tear out carpet, which allowed us to semi-finish a space in our basement for a family room. We didn't roll the entire roll out but rolled it to the poles and made it work. The pellet stove makes it a tolerable temperature in the winter so its become a really great space for family events. As such, for grandma's party, we decided to finally roll out the whole thing and cut around the poles, expanding the space. With enough bodies to drag the massive piece of carpet around, we got it done.

My aunts and cousins moved things all around for the party but this is how I initially had it set when our work was all done.
This space typically has foam flooring for the kids to play on but we pulled that for the party and set up tables and chairs in there. It worked. To better social distance, we had seating inside and outside.
We had to call the serviceman for our pellet stove this fall because we couldn't get it to stay lit. Come to find out, we needed a new thermostat and we needed to reconnect the wire that had come loose when we moved the pellet stove to do all our construction on the wall it previously sat at. He charged us a service charge and taught us A TON about some of the issues we were having with the stove and how to better utilize it. Well worth the service charge. Bought an $18 thermostat, hooked it up, and bam!
When we moved in to the house, our wonderful friends and family moved many of our things into our basement while I unpacked all of the everyday items upstairs. Over the last few years, I've rearranged the basement boxes and utilized some of the items in them. Some of the boxes have been moved from shelf to shelf but never opened. This fall I made it my goal to unpack what needed to be unpacked, purge what needed to be purged, and better organize everything that remained.
This is how it looked during the process. Sorting, pitching, donating, organizing.
It definitely got worse before it got better. SO MANY BOXES!
This is what it looks like now. There are still a few totes of things that will eventually be used as we finish the basement. It had gotten to a point where I couldn't stand to go in this corner. Now it is functional enough that I can easily go and access what I need without stress.
This is another area that frustrated and overwhelmed me. I tolerated it until my husband and children stood on the shelves of these 9 cubes and busted them. Then I struggled to overlook the obvious chaos. I started shopping fb yardsale for an inexpensive solution that would organize the chaos. I went back and forth between a wall of shelves and closed cabinets.
I messaged several sellers that didn't work out and then I stumbled onto this guy. Totally the wrong color for my tastes but nice clean lines. I got it for a steal and even fit the entire thing in the back of my minivan.
I got it home and inside and then it sat for a couple of weeks before I motivated myself to tackle what I knew would be a monster of a project. I had to prime every part and piece, paint every piece dark brown for distressing, and then coat every piece with 2 light colored coats. Poor Merida lost free access to her playroom for a bit but we figured it out. All of it was done in less than a week.
All of our STUFF fit inside the cabinet
My sister came over to make sure all of our electronics worked. (We hadn't used the VHS since 11 N Clover). Thank God for a techie sister!! I was ready to throw it all across the room. lol. Even the freebie dying TV looks good when everything works and the wires are streamlined.
We had some cabinets we'd been given with the renovation of one of the suites in the building that I manage. I decided to paint a couple of them to match the refinished cabinet. At some point, those will be mounted on the wall beside each other and beside the entertainment center. For now, they're sitting atop another cabinet that will eventually disappear. For now, this is a 95% improvement over what it was before so I can deal.
As a fun project to thank Merida for tolerating and helping with all of the projects this fall, I made her a huge box fort. She loves it and so did all her cousins at Christmas.
Last year, I bought this pre-lit tree off fb yardsale just before Christmas. I used some leftover glass bulbs to semi-decorate it and with my crazy family, that didn't go so well. I thought I'd gotten all the broken glass and then my bare foot found a piece. Unpleasant. I then decided that I would make or buy new ornaments for the basement tree that were unbreakable and reflected our family legacy, with a farmhouse touch. Merida helped and I feel like we nailed it. Every member of my family and Mark's family has a personalized ornament and I had alot of fun being crafty with my daughter.
Turner Christmas at the Bouwkamp's


